
LAMP環境構築マニュアル ③ MySQL(8 or 5.7) インストール編
目次
MySQLデータベースのセットアップ
![]()
前回の内容でLAMP環境のためのWebサーバー、Apacheがセットアップできたら
次はRDBMS(リレーショナルデータベース管理システム)としてMySQLをセットアップしていきます。
環境: 「Conoha VPS」メモリ 512MB/CPU 1Coreプラン、CentOS 7.6.1810 (Core)、MySQL 8.0.19 for Linux on x86_64
LAMPとは… 以下の要素の頭文字で構成するサーバー環境のこと
- Linux
- Apache
- MySQL (今ここ)
- PHP
SSHクライアントからサーバー接続して下記の手順を実行していきます。
MySQL をインストール
本記事執筆時点、最新のMySQLバージョン8をインストールします。
mysql公式サイトのyumリポジトリページへアクセス(こちら)
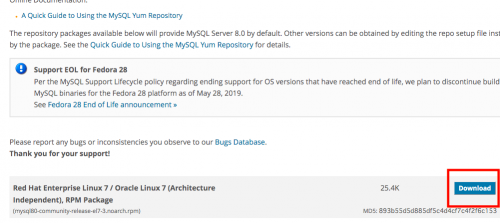
1. Red Hat Enterprise Linux 7 / Oracle Linux 7のDownloadリンクを開く
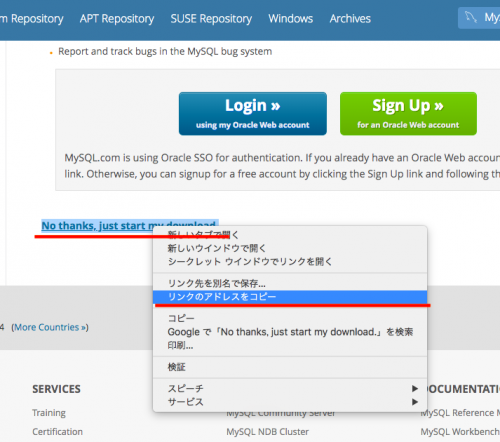
2. rpmパッケージのリンクをコピーする。
No thanks, just start my download. と書かれた部分を右クリックで開き、リンクのアドレスをコピーをクリックする。
MySQLのインストールに必要なrpmパッケージのリンクが以下のURLでコピーされる
https://dev.mysql.com/get/mysql80-community-release-el7-3.noarch.rpm
3. rpmパッケージをインストールする。
2でコピーしたURLを yum install コマンドへ指定して実行し、
rpmパッケージをダウンロードします。
※実行途中にy(Yes)を選択するのが面倒であればコマンドに-yオプションを指定してスキップします。
$ sudo yum install https://dev.mysql.com/get/mysql80-community-release-el7-3.noarch.rpm以下のように表示されればOK。
この時点ではパッケージをインストールしただけで、MySQL自体のインストールは完了していません。
mysql80-community-release.noarch 0:el7-3
4. MySQL 8のインストールを行う。
$ sudo yum install mysql-community-serverインストール完了後、MySQLのバージョン確認
$ mysql --versionmysql Ver 8.0.19 for Linux on x86_64 (MySQL Community Server - GPL)MySQL 5.7
(MySQL 5.7をインストールする場合)
rpmパッケージのインストールURL
http://dev.mysql.com/get/mysql57-community-release-el7-7.noarch.rpm
$ sudo yum -y install http://dev.mysql.com/get/mysql57-community-release-el7-7.noarch.rpmパッケージのダウンロードが完了したらMySQLをインストール
$ sudo yum install mysql-community-serverMySQLを起動させて初期設定を行う
※ CentOS内でのサービス名はmysqlではなく、mysqld
1. 起動
$ sudo systemctl start mysqld.service2. MySQLの状態を確認する
$ sudo systemctl status mysqld.serviceactive (running)で起動中
3. サーバー起動時に自動起動するようにしておく
$ sudo systemctl enable mysqld.servicerootの初期パスワードを確認する
MySQLの管理者ユーザである※rootの初期パスワードを確認しておきます。
※(注意)名前が同じですが、MySQLデータベース上のアカウントでありサーバー本体のrootアカウントとは異なります。
$ sudo cat /var/log/mysqld.log | grep root下記のように表示され、root@localhost: の後の文字列にrootの初期パスワードが表示されますので、控えておきます。
2020-02-16T05:47:06.020817Z 5 [Note] [MY-010454] [Server] A temporary password is generated for root@localhost: Ljf>,Xn<!7bX例の場合は「Ljf>,Xn<!7bX」の部分
MySQLの基本的なセキュリティ設定を行う
mysql_secure_installationコマンドを実行
$ mysql_secure_installationコマンドを実行すると先程確認しておいたrootの初期パスワードの入力を求められ、以降の内容が対話形式で行なわれていきます。
基本的に全てy(Yes)を押していけばOKです。
rootのパスワードを初期設定から変更する (英大文字、英小文字・数字・記号を含めるようにする)
Enter password for user root: (初期パスワード)

The existing password for the user account root has expired. Please set a new password.

New password: (新しいパスワード)
もう一回 rootパスワードを設定するか聞かれますが、必要なければスキップ(No + Enter)でOK
Change the password for root ? ((Press y|Y for Yes, any other key for No) :
匿名ユーザーアカウントを削除する(ユーザー名やパスワードなしでログインできるアカウント)
Remove anonymous users? (Press y|Y for Yes, any other key for No) :
リモート(外部)からrootログイン出来ないようにする
Disallow root login remotely? (Press y|Y for Yes, any other key for No) :
test database(テスト用データベース)の削除
Remove test database and access to it? (Press y|Y for Yes, any other key for No) :
設定を反映する
Reload privilege tables now? (Press y|Y for Yes, any other key for No) :
All done! と表示されれば全ての設定が完了です。
MySQLへ接続(ログイン)出来るか確認する
以下のコマンドを実行し、rootユーザーでMySQLへの接続確認を行います。
$ mysql -u root -pEnter password: と表示されたら、先ほど初期から変更したrootパスワードを入力してEnter
(MySQLへの接続が完了)
Welcome to the MySQL monitor.  Commands end with ; or \g.
Your MySQL connection id is 9
Server version: 8.0.19

Copyright (c) 2000, 2020, Oracle and/or its affiliates. All rights reserved.

Oracle is a registered trademark of Oracle Corporation and/or its
affiliates. Other names may be trademarks of their respective
owners.

Type 'help;' or '\h' for help. Type '\c' to clear the current input statement.

mysql>
(接続を切る場合は exit + Enter)
MySQLのセットアップが出来たら次回は開発言語のPHPを導入します。
参考: CentOS7にMySQL5.7をインストール&ログイン
関連記事
- LAMP環境構築マニュアル ① 概要編
- LAMP環境構築マニュアル ② Apacheインストール編
- LAMP環境構築マニュアル ③ MySQL 8 インストール編
- LAMP環境構築マニュアル ④ PHP7.4 インストール編
- LAMP環境構築マニュアル ⑤ アプリケーション動作確認編(ファイルダウンロード可)
Follow me!
“LAMP環境構築マニュアル ③ MySQL(8 or 5.7) インストール編” に対して1件のコメントがあります。
コメントは受け付けていません。